There are various options to transfer data into a Linux VM, if you have ssh enabled then WinSCP / SCP client tools will work seamlessly even if you choose to use ssh keys instead of password logins, however you may need to transfer files between VMs and again you can use scp or configure vsftpd
Transfer data from Local PC to Linux VM
To configure WinScp, go to Advanced, SSH, Authentication and select the private key file
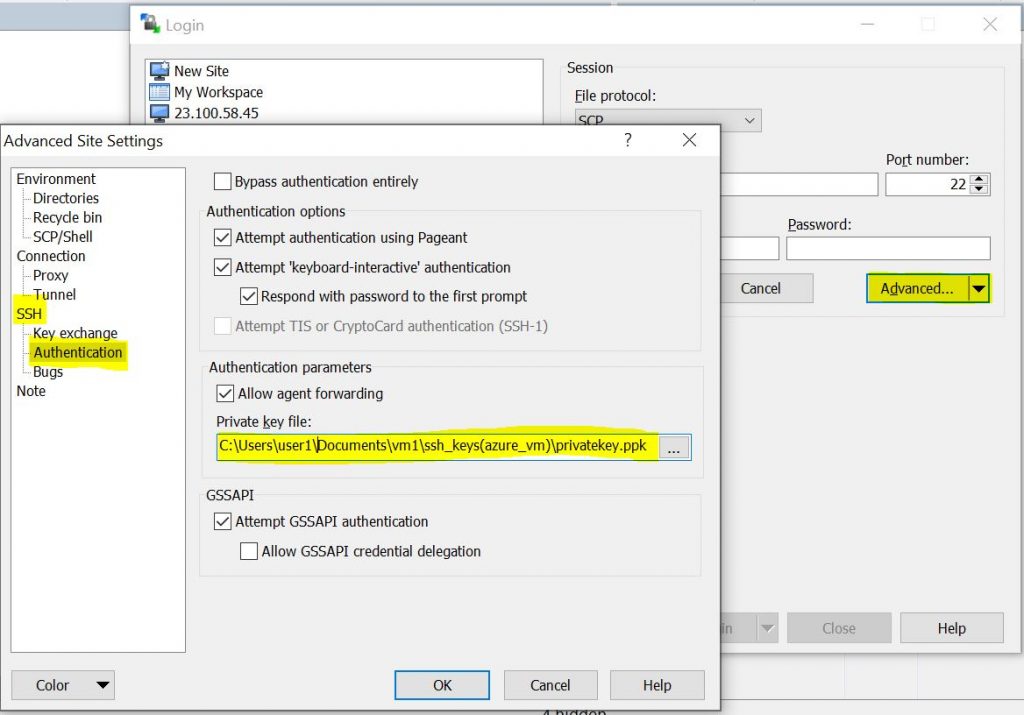
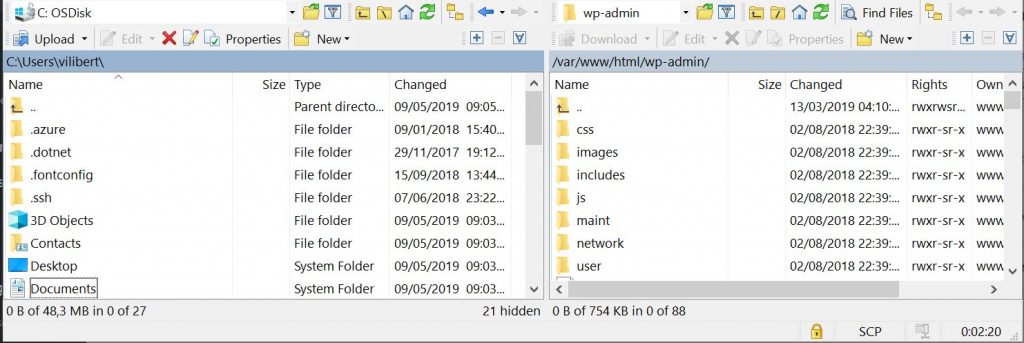
Once you have logged on you will have the ability to drag and drop files from local to remote
Ensure you have the relevant ports configured in Azure NSG settings, additional networking configuration maybe required if you are accessing your Virtual Machines over Express Route, VPN or from on-prem systems.
Install vsftpd and test locally
Another option is to configure a vsftpd server in your Linux VM (Very Secure File Transfer Protocol Daemon) this will allow secure transfer
Simple ftp servers have vulnerabilities to cyber attacks, but if using RHEL 7 you can set up vsftp which works with TLS and offers some level of encryption.
For additional information on how to set up vsftp please refer to the Red Hat link here
VSFTPD setup:
Install vsftpd (very secure FTP daemon) package.
#yum install vsftpd ftp
Configure the ftp server on linux by editing the file /etc/vsftpd/vsftpd.conf
#vi /etc/vsftpd/vsftpd.conf
Change the line which contain:
anonymous_enable=YES
and change to
anonymous_enable=NO
This will permit any one to access FTP server with authentication.
anymous_enable=YES
Uncomment the following lines
local_enable=YES
This will allow login to users listed in /etc/passwd
write_enable=YES
and this enables users to write files.
Change the line
chroot_local_user=NO
to
chroot_local_user=YES
This will permit local user as FTP account. If you add a user, to the Linux system it will be treated as a FTP account as well.
The users local directory will be their FTP directory.
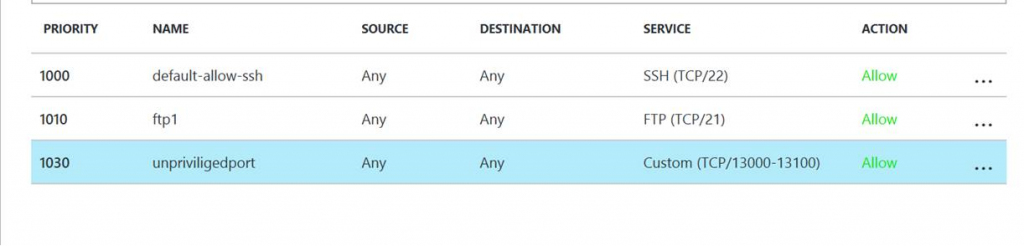
Configure firewalls/Iptables to allow port 21 and other unpriviliged ports to be used for data channel.
For simplicity and testing purpose, simply disable iptables.
Start the ftp service
#service vsftpd start
Enable the service at boot time ( based on sysvinit, please use systemctl command if you are attempting this on a 7.x server)
#chkconfig vsftpd on
Test the service locally
Create a new user account to test the ftp server
#useradd ftplinux
#passwd ftp linux
Login to ftp
#ftp localhost
$ ftp localhost
Trying ::1…
ftp: connect to address ::1Connection refused
Trying 127.0.0.1…
Connected to localhost (127.0.0.1).
220 Welcome to vm1 FTP service.
Name (localhost:vm1): ftplinux
331 Please specify the password.
Password:
230 Login successful.
Remote system type is UNIX.
Using binary mode to transfer files.
ftp>
Passive mode configuration
Edit /etc/vsftpd/vsftpd.conf with the following parameters:
#vi /etc/vsftpd/vsftpd.conf
Listen=YES
pasv_enable=YES
pasv_min_port=13000
pasv_max_port=13100
port_enable=YES
pasv_address=40.122.174.121 (this is the public ip address for vm1 server)
pasv_addr_resolve=NO
Note : data connections are restricted to using the 100 ports (13000-13100). The port range to be assigned should be > 1024 ( unpriviliged ports
Restart the service
In the Azure portal, perform the following NSG configuration to match the GuestOS port configuration :
Configure a ftp client on linux:
Here an ubuntu server is used to host the ftp client to remotely connect to vm1
First, ensure ftp client is installed
#apt-get install ftp
Test ftp connection with the server,
root@ubuntu1:~# ftp -p 40.122.174.121
Connected to 40.122.174.121.
220 Welcome to vm1 FTP service.
Name (40.122.174.121:vm1): ftplinux
331 Please specify the password.
Password:
230 Login successful.
Remote system type is UNIX.
Using binary mode to transfer files.
ftp> ls
227 Entering Passive Mode (40,122,174,121,50,245).
150 Here comes the directory listing.
drwxr-xr-x 2 0 0 4096 Nov 23 21:39 file1
drwxr-xr-x 2 0 0 4096 Nov 23 21:38 file2
226 Directory send OK.
Here, a good thing to check is the “Entering passive Mode ((40,122,174,121,50,245)
Here, 40,122,174,121 is the public IP address as advertised in the vsftpd.conf. multiply 50 with 256 and add the last number to get the port connected to :
50*256 + 245 = 13045 ( which is well within the range 13000-13100)
SFTPD setup:
scope: setup a SFTP jail on the Linux VM with public key authentication.
HOWTO:
1) Login as the root user
$ sudo -i
2) Edit the /etc/ssh/sshd_config file to have the following parameters instead of the original ones we entered:
$ vim /etc/ssh/sshd_config
Match Group sftpuser
ChrootDirectory %h
X11Forwarding no
Pubkeyauthentication yes
AllowTcpForwarding no
ForceCommand internal-sftp
AuthorizedKeysFile /var/sftpjail/%u/.ssh/authorized_keys
3) Restart SSH
$ service ssh restart
4) Make a new SFTP jail directory
$ mkdir -p /var/sftpjail
5) Make the SFTP group
$ groupadd -r sftpuser
6) Make the SFTP user
$ useradd -m -g sftpuser -s /usr/sbin/nologin -d /var/sftpjail/sftpuser sftpuser
7) Create the new user’s authorized_keys file
$ mkdir /var/sftpjail/sftpuser/.ssh
$ mkdir /var/sftpjail/sftpuser/uploads
$ vim /var/sftpjail/sftpuser/.ssh/authorized_keys
Paste the public key into this file, save and exit it.
8) Modify ownership and permissions for jail directories
$ chown -R sftpuser:sftpuser /var/sftpjail/sftpuser/.ssh
$ chown sftpuser:sftpuser /var/sftpjail/sftpuser/uploads
$ chmod 700 /var/sftpjail/sftpuser/.ssh && chmod 600 /var/sftpjail/sftpuser/.ssh/authorized_keys
8) Login with your SFTP client with user sftpuser and the private key that matches the public key set in step 7 (authorized_keys)
9) Repeat steps 6-8 for each additional user
Note: if you want to add a new group other than sftpuser that has a separate sftp jail, you will need to add a new Match block in /etc/ssh/sshd_config.
Example:
Match Group sftpuser2
ChrootDirectory %h
X11Forwarding no
Pubkeyauthentication yes
AllowTcpForwarding no
ForceCommand internal-sftp
AuthorizedKeysFile /var/sftpjail2/%u/.ssh/authorized_keys

Recent Comments